Showing posts with label North River Penthouse. Show all posts

7.08.2009

Eating area for two


So there has been a bit of progress in the little eating area. I've added two beautiful Tobias chairs and a cool KNAPPA pendant lamp, both from IKEA. I've been eyeing these items for a while. I was also looking at the MONACO Large Pendant Lamp from EQ3, but it requires "hardwire" installation, which is not possible in a rental. I don't like seeing the cord hanging so I ran the cord on the ceiling towards the corner of the wall and attached it with an IKEA kit. Turned out pretty good, you can barely see the cord down the wall.

M2JL :: STUDIO project IKEA KNAPPA lamp Tobia chair


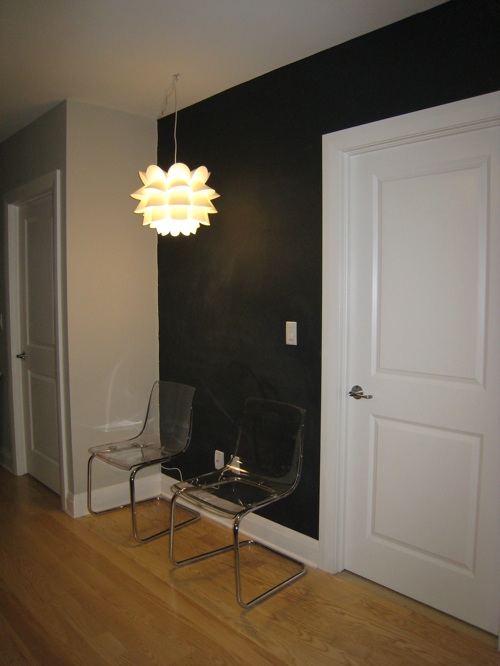
Since there wasn't a lot of space, I decided to use transparent chairs in order to take less visual space. The lamp adds a great contrast against the wall. The shape is reminiscent of water lily.

M2JL :: STUDIO project IKEA KNAPPA lamp

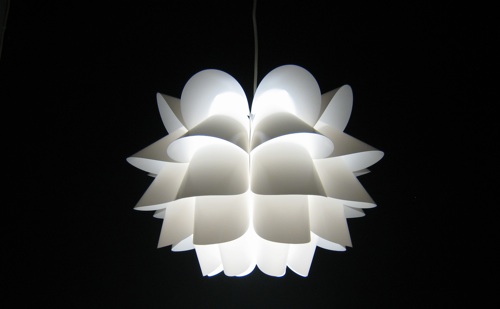
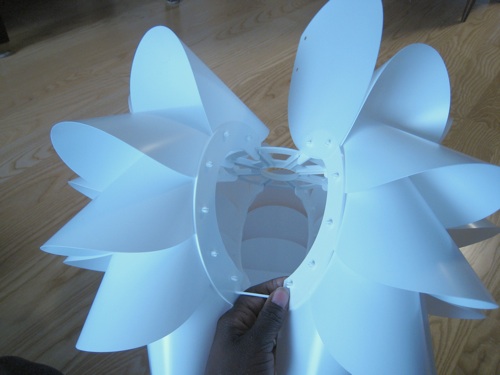
It was an interesting lamp to put together. When I opened the box, I was a bit taken back by all the pieces. But it was easy and quick to put together. I'm always impressed at the way IKEA manages to minimize its packaging and the ingenuity it took to come up with a way to break down their items as much as possible and still make it easy for people to put together. And if I'm not mistaken, the parts are recyclable!

M2JL :: STUDIO project IKEA KNAPPA lamp

M2JL :: STUDIO project IKEA KNAPPA lamp


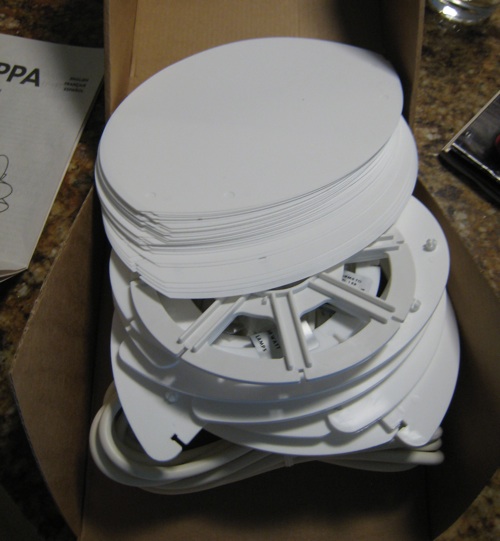
The next step is the table. I've spotted a really nice one at Zone Maison. I thinks it's called the bar table - Lily. The one that I saw (at the store) looks very similar and it can go up or down. Ideally I'd like for it to go down from coffee table height up to table height, so that it would have a dual purpose. Again, the use of glass reduces the visual weight of the furniture and doesn't take too much space and the highly reflective surface increases the amount of lighting in this area.

M2JL :: STUDIO project Zone Maison Round glass table

6.25.2009

Bathroom makeover : Part 1


As you can see in the following "before" pictures, the bathroom needed a bit of personality. It's a nice size room, but there was just way too much white and not a lot of storage. There was no medicine cabinet, only one towel bar... It's a bit tight for a couple.

Before...
M2JL STUDIO Bathroom makeover - Before

M2JL STUDIO Bathroom makeover - Before

M2JL STUDIO Bathroom makeover - Before


I would love to reconfigure the bathroom, change the towel bar (I really don't like the plastic ones) but there's only so much you can do in a rented space. Still there are simple ways to make it your own, make it more functional and give it a bit of personality. The color scheme for the bathroom is similar to that of the rest of the place, as discussed earlier in a previous post. Of course in a bathroom changing the shower curtain makes a big difference because it takes a good portion of the available wall space. I used a charcoal shower curtain, which definitely makes a statement. I plan to add a special treatment to the corner wall next to the tub. (more on this later)

M2JL STUDIO Bathroom makeover - Before


On the opposite wall I used a dark gray paint (Gray from Benjamin Moore). The rest of the walls were kept white to not darken the space too much.

M2JL STUDIO Bathroom makeover - Before


Against the dark wall, additional storage, in the form of IKEA's Estetisk CD Cabinet, were used to store extra items. They were installed a bit high to avoid hitting your head while brushing your teeth. I love the contrast of the wood against the dark wall.

M2JL STUDIO Bathroom makeover - Before


There is still some more work to do to finalize it, but it's getting there. Stay tuned for more later.

4.09.2009

Magnetic Chalkboard wall


There it is! :) The magnetic chalkboard paint was heavier and darker than the Benjamin Moore chalkboard paint. Basically the magnetic chalkboard paint was applied on the first coat and the Benjamin Moore chalkboard paint was applied on the second coat. The first can has no indication as to how many coats of paint is required or what the coverage is. In this case one can was enough for one coat. But I think 2 coats would probably be better. The paints didn't smell much either, which is always a plus.

Before...
M2JL :: STUDIO project

First coat of magnetic blackboard paint
M2JL :: STUDIO project

Final result with the Benjamin Moore chalkboard paint
M2JL :: STUDIO project

A close up on a little butterfly magnet on the wall.
M2JL :: STUDIO project


After a couple days, the chalkboard wall is ready for use :) I love the contrast of the charcoal against the light wood tones of the floor and the wardrobe. It will look even better once the other walls are painted and the furniture and accessories are in place.

3.26.2009

North River Penthouse


I believe that even if you live in an rental, you should take the time to design and decorate it to your taste. Your environment affects your well being in so many different ways, so why not take the time to customize it so you live a little happier and a lot more comfortable?


I'm currently starting a new project : North River Penthouse, which is a rental, so obviously we don't want to spend too much money on it, but it can definitely use a bit more personality. Don't get me wrong, it's a nice apartment, but I find it to be a little too much on the yellow side (the floor, the wall, the cabinet).
M2JL STUDIO PROJECT


So one of the main things will be to break that yellow and introduce other colors. In this case, we're going modern and sleek look (as much as possible) and we're taking inspiration from nature (rocks, woods, etc).
ROCKSROCKS


First things, first : Paint. It's the cheapest and easiest way to completely change the look and feel of a room without spending too much money. This time, we're going with grays: A light warm gray from Benjamin Moore called Gray Owl and a darker gray for a bit of contrast, also from Benjamin Moore, simply called Gray. These will be used throughout the flat.
Benjamin Moore ColorsBenjamin Moore Colors


For some reason, I love chalkboard paint. I've used the one from Benjamin Moore on several projects and I'm going to use it again on this wall. I also finally found a magnetic chalkboard paint that I will try on this project. The magnetic chalkboard is much heavier than the Benjamin Moore one. We'll see.
Chalkboard paints


The wall is pretty much ready to be painted. In this case I chose the "box" to receive the chalkboard paint. I like to use the architecture to decide where the paint is going to go.
M2JL STUDIO PROJECT


Here's a neat little trick: When I take out the outlet covers, I always tape the corresponding screws directly on the plate to make sure I don't loose them.
M2JL STUDIO PROJECT
Stay tuned for more coming soon :)